A Month of Ocean Themed Fun

This is a list of activities that we will be doing for February… Our Ocean Theme month.  We will be adding and building onto our theme throughout the whole month.  Topics to be covered: the ocean, water animals, beach, boats, pirates.


Books

  • Commotion in the Ocean
  • Wow! Ocean
  • Ocean Babies
  • Into the A.B.Sea
  • Under the Sea 1,2,3
  • Shark in the Park
  • The 3 Little Fish and the Big Bad Shark
  • Dolphin Baby
  • Ahoy Pirates
  • …looking for more beach and pirate themed books

Science and Sensory:

  • Shells exploration
  • Ocean books
  • Sink/Float
  • Discovery Bottles (ocean water, pirate treasure, and beach i-spy)
  • Nat Geo shows about Ocean
  • Water Table with Toob/shells/pebbles/nets etc
  • Iceberg Bath with penguins and whales/dolphin


Reading:

  • words on fridge
  • story props and words retelling story
  • Words that rhyme with shark, fish, whale etc…
  • Ocean picture books, submarine book
  • Whale letter match (uppercase and lowercase letters)


Writing:

  • writing ocean words
  • practice writing with dry erase board


Crafts:

  • Toilet paper tube octopi/paper octopus ‘wind catcher’ craft
  • Paper bowl and streamer jellyfish
  • Paper bag fish
  • Paper plate seahorses
  • Submarine
  • Fishing boat
  • Scissors practice


Activity

  • Make playroom into ocean (decorate together with art projects as the month goes by)
  • Create out submarine and fishing boat together (submarine in the playroom, boat in the living room)
  • Shell memory game
  • Discussion posters (what do you know, what do you want to know, what have you learned)
  • Seashells, buckets, shovels, molds and Sand-doh
  • Beach ball play
  • Treasure hunt (make a treasure map and follow clues to find the pirate’s buried treasure chest)


Math

  • Seashell sorting
  • Seashell patterns
  • Feed the shark (counting and small motor skills practice: make a shark mouth out of a box, cut small hole for mouth and insert plastic cup, child uses tweezers to pick and place glass pebbles one at a time in the sharks mouth, counting as they do so)


Field Trips

  • visit the zoo
  • visit a pet shop


Just for Audrey:

  • Fish/sharks etc in solid colors on the fridge and laminated for her to learn colors also make some for the magnet board
  • Ocean squishy bags
  • Ocean foamy sticker collage

Advent Activity Calendar


DSC_0004

Hello and Merry Everything!   For the 25 days leading up to Christmas we are doing our own version of an Advent Calendar.  I wanted to get this post out early so you could prepare before December 1st.  We are so excited to start!

Here’s the idea… purchase or make your own advent calendar – there are SO many out there!  The one I purchased is from Target (duh) for $29.99.   Then come up with a list of 25 special activities (one per day) you can do to celebrate the season of giving!

DSC_0005DSC_0006

Here’s the list we came up with, use some or all if you want, but make it special for your family.

1. Bake Christmas Cookies

2. Write a letter to Santa

3. Make a special Christmas Tree Ornament

4.  String popcorn and cranberry garland and hang outside for the birds

5. Cut, decorate and hang snowflakes

6. Drive around and look at Christmas lights (<—last year we stopped at Dairy Queen and got chocolate malts to enjoy on our drive!)

7. Have a Christmas Movie Night!

8. Buy mittens and donate for the mitten tree at church

9. Make a special present for Grandmas and Grandpas

10. Have a picnic lunch by the Christmas tree

11.  Buy and donate treats for dogs and cats at a shelter

12. Visit Santa

13. Buy and donate a toy for a child in need

14.  Make and send Christmas cards

15. Decorate a gingerbread house

16. Go on a moonlit winter walk

17. Have a red and green dinner

18. Go sledding and have cocoa

19. Meet Daddy for lunch

20. Put on a Christmas concert

21.  Go ice skating and have cocoa

22. Buy and wrap a gift or each other (<—- Aedan and Audrey)

23. Make Christmas Soup

24. Read The Night Before Christmas and set out a plate of cookies for Santa and Reindeer

25. Celebrate, Cherish, Enjoy!  Merry Christmas!!!

Have Fun!

Erin

DSC_0007

Being Thankful

Hello All,

This post is coming a few days late of Nov 1st, but you can catch up!!!

DSC_0148DSC_0164DSC_0159

For the month of November I have seen a lot of people posting on social media things that they are thankful for, but for us I think reflecting privately may be more meaningful.   (Ha!  and here I am blogging about it, lol)  This November we constructed a Thankful Tree in our playroom with the intention to  think of one thing that we are thankful for everyday, write it on a leaf and place it on our tree.  Aedan is 3 1/2 and it seems likes he is starting to grasp the meaning of being thankful and counting his blessings.  He also finds it amusing to guess the things that his 1yo sister, Audrey, is thankful for too.

DSC_0258

For the tree, I went to Target (and spend way more money on things that I ‘needed’ and had no previous intention on buying – like cowboy boots for my 1yo; darn you Target!) …..   AND bought brown wrapping paper in the gift wrap aisle ($2.99) I also bought a pack of foam leaves at the beginning of Sept and am reusing for this project.  The pack was 24 leaves for $4.99 not sure if you can still find these as it seems that fall has been replaced with Christmas already; if not, you can always find a leaf template online and trace and cut your own out of construction paper. I also ordered a few Thanksgiving/Thankful themed books from Scholastic (I have my own teacher account) to display on the shelf by the tree.

DSC_0256

DSC_0254

To make the tree I ripped the paper in 1-3ft sections and twisted them together.  I used blue painters tape to attach the trunk and branches to the wall for attempt #1 which failed horribly (the whole tree was on the floor of the playroom) after a few hours.  Attempt #2 seems to be more successful so far; I used good ol’ packaging tape.  <—-I’m not worried about the tape damaging paint on the walls since we will be repainting the playroom this spring so use at your own discretion.   I also made a title for our tree, “I’m Thankful For…” out of construction paper.

While we were constructing the tree (Aedan was very helpful handing me pieces of tape and helping me twist the wrapping paper.) we talked about what it means to be thankful and our blessings (as individuals and as a family).  After the tree was done we read the books and Aedan came up with his first ‘Thankful Leave’ …..  DINOSAURS.  LOL   So far, on day 5, he is thankful for Dinosaurs, Dragons, Preschool and his teachers, leaves in the fall, and Whistling Well Farm(where we pick apples and pumpkins every year).

The books I have on the shelf are “Thanks for Thanksgiving,” by Julie Markes, “Just So Thankful,” by Mercer Mayer, and “Give Thanks for Each Day,” by Steve Metzger.   More are on the way!

We are working on being thankful everyday/all year round, but it’s such an important and valuable lesson that I think we will get a lot out of our Thankful Tree by taking a few minutes everyday to stop and discuss what we are thankful for and how blessed we are.

Have fun!

Erin

DSC_0237

Fall Fun for 3 and 1


I’m BACK!  Hopefully you have looked back to last year’s fall blogs for some fall activities.  Aedan has started preschool 2 days/ week so our days aren’t jam-packed with activities like last year, but here’s what we have done for fall so far and a look at our activities for the week…

School Bus Puzzle

For this project I cut out and constructed the school bus and showed it to Aedan.  We talked about what it looked like; the shapes etc.  Then we mixed up the pieces and he reconstructed it and glued it onto his paper.

DSC_0001

DSC_0002

So much focus!

Hand-tracing Apple Tree

1.  Rip and roll tissue paper in to little balls

2. Cut a piece of green construction paper up into small pieces (great for small-motor skills practice)

3. With your child, trace their hand a cut out of brown construction paper; this is the tree trunk/branches.  Glue to blue construction paper

4.  Encourage your child to glue the green ‘leaves’ and red ‘ apples’ on their tree.

DSC_0003

DSC_0005

For my 1yo :  Her first experience with finger-painting!  I cut out a maple leaf and oak leaf out of construction paper and taped it to a piece of white construction paper.  A couple drops here and there of red, yellow and orange paint and away she went!

DSC_0011

She wasn’t too sure about the texture at first…

DSC_0018

…but it didn’t take long for her to get into it!

DSC_0029

She’s just about the cutest little mess ever

DSC_0033

Remove the leaves after the painting is dry!

ACTIVITIES FOR THE WEEK AHEAD (pics to come later)…

BEAR CAVE

This week we are going to create a bear cave by covering their little playroom table with a blanket and filling it with blankets and pillows.  We are going to talk about how animals prepare for winter in the fall: some birds fly south and some animals bulk up and hibernate.

FALL SENSORY BUCKET

The base of the bucket is dried pinto beans, green split peas, and black beans.  Added to that are mini gourds and pumpkins (i bought some tiny foam ones from the dollar store), leaves, measuring cups, tweezers, rakes and scissor scoops etc.

FELT BOARD

Four red apples on the tree,
One fell down, then there were three.

Three red apples, shinny and new,
One fell down, now there are two.

Two red apples, under the sun,
One fell down, now there is one.

One red apple, now I see.
When it falls down, no more apples on the tree!

Audrey (1yo)

*Fall Trees Finger Painting.  I will paint a tree trunk and branches on white construction paper and have her use finger paint to create the leaves

*Leaf Pick-Up.  She loves emptying buckets and picking up right now so I have a small basket filled with silk fall colored leaves that we will play with in the playroom with the bear cave – dump out, throw around and pick up.

*Leaf baggie painting/ color mixing.   Cut out a construction paper leaf.  Place in baggie with a couple drops of red and yellow paint.  Encourage her to smear and mix the paint together.

Aedan (3yo)

*Fall Scavenger Hunt and Nature Walk.  We will be reading some books about fall and then discuss some of the things we might find outside in the fall.  I will make a list (drawings and words) of these items on paper and we will go on a fall nature walk and scavenger hunt and cross off and (if possible) collect the things on the list.  Some items might be acorns, pine cones, red leaf, yellow leaf, orange leaf, brown leaf, goose flying, pumpkin, etc

*Fall Collage.  Using the things we collected during out scavenger hunt we will make a collage.

*Fall Words Writing Practice.

*Sink Float Science Experiment.  Items to include:  leaves, gourds, pumpkins, rocks, pine-cones, acorns.  Let your child hold them and hypothesize if they will sink of float.  Make a chart as you go along.

I will post pictures as the week goes on.  Have fun!

Erin


Earth Week

Earth Week

April 22-26

Books:

Earth Day, Birthday

Tiny Planet Series


Songs/Feltboard:

Earth Day Song

Sung to “Mulberry Bush”

This is the way we clean up trash,

Clean up trash, Clean up trash.

This is the way we clean up trash,

To help our Mother Earth

(Recycle cans…; Compost scraps…; Plant a tree…; etc.)

“Thrift Shop” by Macklemore and Ryan Lewis

Just listen to this by yourself because it’s awesome.  Not for the kiddies.

Literacy

  • Vocabulary words including earth, reduce, reuse, recycle, thrift shop, litter, landfill, etc.
  • Tell what happened in the story and favorite part of the story
  • Alphabet Garden  http://www.notimeforflashcards.com/2012/04/alphabet-garden-alphabet-for-starters.html
  • Go for a nature walk and call attention to specific things you see.  When you get home, have your child draw a picture about what they saw on the walk.  Ask them to tell you about it and as they talk, write what they say.


Math:

  • Patterns- Cut circles out of thin cardboard and paint.  Allow to dry then work with your child to create patterns.  (You may want to also create a pattern grid with the cardboard.  Early learners will benefit from having a template.)
  • Counting/1:1-  Using a craft knife, slice a tp roll into circles and paint.  Glue Earth pictures or photos from a field trip/experience onto the back using hot glue.  Put a magnet on the back of the picture.  Have the child count the circles while moving them from one designated space to another on the fridge.  (You can just tape off circles or squares.)


Fine Motor/Writing

  • letter writing E is for Earth- put a little paint (blue and green) into a ziplock and have the child write E and e with their finger.
  • Scissor Skills- Give your child a pieces of blue and green paper (reuse what you have if you can).  Have your child use their scissors to cut the paper into tiny pieces.  SUPERVISE CONSTANTLY.  Glue the pieces onto a paper plate to make an Earth.
  • Create beads by cutting strips of used paper or magazine pages.  Paint with glue and roll- make sure you leave a hole through the center.  Wait for them to dry then your child can string them into necklaces.


Science/Sensory:

  • Create a fairy garden by reusing a planter, pot, or coffee can.  Use other recycled materials for a house, gate, stepping stones, etc.  Then, plant a few small plants around the house.
  • Water Play- provide an aquarium net and work on cleaning the ‘trash’ out of the water.  Use small pieces of aluminum foil, cardboard, beads, etc for trash.
  • Melted crayon candle: http://www.notimeforflashcards.com/2009/04/naptime-creation-recycle.html


Arts and Crafts

Recycled Book Box

Use a cardboard box that picture books will fit into- a cereal box may be too small.  Seal the box up then cut the top off at an angle (like a magazine file).  Paint and decorate the box with your child.  Fill with your child’s favorite books.  The book box can be used next to their bed or in the car.


TP Roll Binoculars

Glue two tp rolls together to make binoculars.  Have your child paint and decorate them.  Punch holes and attach a string.


Milk Jug Sun Catchers

Cut out star shapes from the sides of milk jugs and have your child color them with permanent markers.  Punch a hole and hang in front of a window.


Recycle and Paint  http://www.notimeforflashcards.com/2013/04/painting-with-recycled-objects-earth-day-art.html


Field Trips/Experiences

Local Produce Market- Explore what local produce is available and talk about how buying locally will reduce your carbon footprint


Park Cleanup- WEAR GLOVES AND BRING HAND SANITIZER!  Go to the park and clean up trash.  Recycle paper, plastic, and metal cans.  Put the rest into the garbage can.


Thrift Shop-  Take a trip to the thrift shop and refashion something with the kids this week.  A pillowcase dress, a sheet or towel into a superhero cape, an old frame into a jewelry organizer… just go with what you can find.


Other Resources

Birds!

Birds

April 15-19

Books:

  1. Birds by Kevin Henkes
  2. Wild Birds by Joanne Ryder
  3. Baby Birds First Nest by Frank Asch
  4. South by Patrick McDonnell
  5. Sophie’s Window by Holly Keller
  6. Tico and the Golden Wings by Leo Lionni

Songs/Feltboard:

Five Little Owls

Five little owls on a moonlit night
Five little owls are quite a sight.
Five little owls Are you keeping score?
One flew away! And then there were Four.
Four little owls happy as can be,
One flew away then there were Three.
Three little owls calling Who, Who
One flew away and that left two.
Two little owls having lots of fun.
One flew away and that left One.
One little owl we are almost done
He flew away and that leaves none

The Little Ducklings

All the little ducklings

Line up in a row

Quack, quack, quack

And away they go.

They follow their mother

Waddling to and fro

Quack, quack, quack

And away they go.

Down to the big pond

Happy as can be

Quack, quack, quack

And away they go

They jump in the water

And bob up and down

Quack, quack, quack,

They swim all around.

All the little ducklings

Swimming far away.

Quack, quack, quack

They’ll play another day.

Bird Printables and Additional Bird Resources:

Language/Reading

  • Vocabulary words including wing, bird, worm, nest, hatch, feeder etc
  • Tell what happened in the story and favorite part of the story

Math:

  • Counting the leaves on branches (printables)
  • 1:1 counting plastic eggs and put them in bird’s nest (use a basket)

Fine Motor/Writing

  • letter tracing sheet B is for Bird
  • playdough sheets (B is for bird from Carisa’s pack)
  • bird to the birdhouse tracing sheets (from Carisa’s pack)
  • Hungry Birds Activity

Love love, this fine motor: bird eating worms  - use a clothes pin to pick up pipe cleaners  ***Jolena really had fun with this one.  We didn't stripe the "worms"  I can see how it does help fine motor skills as well as encouraging creative problem solving for those hard to get worms. :)

Materials: green/brown pipe cleaner, clothes pins

Have you child pick up the ‘worms’ using their ‘beaks’!!!

Science/Sensory:

  • take a nature walk and look for birds in your neighborhood and yard
  • Read this online book together about the life-cycle of a duck  http://www.wegivebooks.org/books/see-how-they-grow-duck
  • check out an ornithology book from the library and look at different species of birds with your child
  • Place a bird feeder close to a window and watch what kinds of birds come.  Identify the birds you see in the ornithology book and keep a tally using a sticker chart.
  • Bird Seed Sensory Bucket

Spring Sensory bin with bird seed, birds nests, birds, worms, clothespins as birds beaks, tweezers, mini plastic eggs, pom poms, etc.

Materials:  paper bags (roll down to make bird’s nests), fake birds, birdseed, fake insects, egg carton, plastic eggs, kid tweezers, pom poms, clothes pins etc

Art

Peacock Craft

Peacock plate - maybe a need someday

Materials: coffee filter, water color paints, construction paper, googly eyes

Robin Footprint Paintings (*babies)

B    Bird:  Robin footprint craft!  For those with 'little ones"

Materials: construction paper, brown/red paint, orange marker

Paint with feathers

Materials: paint, construction paper, feathers

Bird Paper Plates

Like this for preschool/young kids! Do you love the children's books by Don and Audrey Wood? Juggling With Kids made paper plate birds that were inspired by the book "Birdsong". Check out the other 20+ bloggers that also linked up great activities from other books by Woods. You won't be disappointed! #Jugglingwithkids #paperplate #birds #craft #donandaudreywoods #books

Materials: paper plate, curling ribbon, construction paper, tissue paper, glue, stapler

http://www.jugglingwithkids.com/2012/07/summer-virtual-book-club-don-and-audrey.html

On the Farm

On The Farm

April 8-12

Letter Mm:

  • Mm words:
  • Mm writing

Books:

    1. Mrs. Wishy-Washy by Joy Cowly* http://www.youtube.com/watch?v=S3lPl26wO_4
    2. Mrs. Wishy-Washy’s Farm by Joy Cowly
    3. Big Red Barn by Margaret Wise Brown*
    4. Click Clack Moo by Doreen Cronn
    5. Big Fat Hen by Keith Baker
    6. How Big Is A Pig? by Claire Beaton
    7. Lulu The Big Little Chick by Paulette Bogan
    8. The Grumpy Morning by Pamela Duncan Edwards
    9. One Little Chicken by David Elliot
    10. Does A Cow Say Boo? by Judy Hindley
    11. Barn Dance by Pat Hutchins
    12. Baby Says Moo by JoAnn Early Macken
    13. Grunt by John Richardson
    14. Wee Little Chick by Lauren Thompson
    15. Sally Goes to the Farm by Stephen Huneck

*used in the curriculum

Songs/Feltboard:

Mrs. Wishy Washy:  Read the story, then act it out using flannel/magnet board pieces.  These pieces can be printed out (just google it) or drawn.


Five Little Ducks:  Go here for a cute printable for the fridge with all of the lyrics and a graphic.  http://www.dltk-teach.com/t.asp?b=m&t=http://www.dltk-teach.com/rhymes/ducks/cfive-ducks.gif


Ten Little Piglets sung to the tune of “Ten Little Indians”


One little, two little, three little piglets,
Four little, five little, six little piglets,
Seven little, eight little, nine little piglets,
Ten are in the mud.


All are pink with pudgy noses,
They don’t smell a bit like roses,
Curly tails that look like hoses.
Rolling in the mud.


Ten little, nine little, eight little piglets,
Seven little, six little, five little piglets,
Four little, three little, two little piglets.
One is in the mud.


Monday:

Introduce theme:

  1. Read a book about farm animals.
  2. What animals live on the farm?
  3. What are the names of the animal babies?  (Cow-calf)


Muddy Pig (Mrs. Wishy-Washy)

Show this Mrs. Wishy-Washy video if you can’t find the book.  It’s out of print.  http://www.youtube.com/watch?v=S3lPl26wO_4

Materials:  pink cardstock pig, small piece of sponge, brown paint, shaving cream

  1. cut a pig from cardstock
  2. mix shaving cream with a little brown paint to create mud paint
  3. have your child make the pig muddy by sponging and using the fingers to smear the mud paint onto it


Farm Animal Patterns

Go here: http://havefunteaching.com/worksheets/themes/farm-worksheets/farm-sequencing-activity.pdf  to print a set of pattern cards.  If the patterns are too difficult, just print multiples of the individual animals and make your own.


Tuesday:

Peek-A-Boo Barn (Big Red Barn by Margaret Wise Brown)

Materials:  white cardstock, red paint, other color construction paper, scissors, glue stick, printouts of farm animals, crayons/markers/colored pencils

  1. Cut a barn out of the white cardstock
  2. Have your child paint it red- wait for it to dry
  3. Cut several flap doors and windows into the barn (use a craft knife)- do not cut them off completely.  This way your child can open and close them for the peek-a-boo effect.
  4. Place the barn onto another piece of construction paper and carefully trace where each door and window is located.
  5. Have your child glue pictures of farm animals that they have colored onto the traced spaces.
  6. Glue the barn onto the other paper.
  7. Write the animal name on the inside of each door and window.


Farm Sensory Bucket

Materials:  popcorn kernels, farm animal/baby farm animal toob, silohs, barn, fence (hand make using t.p. roll, popsicle sticks, and cardboard.


Wednesday:

Paper Plate Farm Animals

Materials: large and small paper plates, paint, cotton balls, glue, googly eyes


Farm Dramatic Play

Materials:  Cardboard box, red and white paint, cowboy hat, boots, plaid shirt, various stuffed farm animals, gift bag shredded paper (yellow hay)

Paint the box to look like a barn and cut a door in the front.  Have the dress up clothes and other props available.


Thursday:

Farm Animal Sugar Cookies

http://www.bhg.com/recipe/cookies/sugar-cookie-farm-animals/

Farm Playdough Mats

Materials:  Printed playdough mats from etsy or create your own, laminating paper, page protectors, or contact paper, playdough

https://www.etsy.com/listing/112990219/on-the-farm-playdough-learning-mats


Friday:

Visit a local farm or watch a video about a trip to a farm.  Take pictures (print pictures) and display at child’s height so they can relive the experience.


Extras:

  • This is a preschool center printable packet.  It’s a free download from teacherspayteachers.com.  Print on card stock or laminate.

http://www.teacherspayteachers.com/Product/Farm-Center-Printables

Spring Weather

Spring Weather

April 1 – 5

Letter Ll:

  • Ll words:
  • Ll writing

Books:

    1. Cloudette by Tom Lichtenheld
    2. It looked like spilt milk by Charles G. Shaw
    3. Waiting out the storm by Joann Early Macken
    4. Outside your window: a first book of nature by Nicola Davies
    5. Split! Splat! By Amy Gibson
    6. Rain, Rain, Go Away by Vivianna Garofoli
    7. Underpants Thunderpants by Peter Bently


Songs/Feltboard:

Five Little Raindrops

Counting Up:
One little raindrop in the dark, dark sky
Two little raindrops watch the clouds roll by
Three little raindrops go splat, splat, SPLAT
Four little raindrops, we’ll need boots for that!
Five little raindrops and still no sun?
That’s too much for us, we’d better… RUN!

Counting Down:
Five little raindrops above the forest floor,
One fell away and then there were four.
Four little raindrops hanging from a tree,
One dripped down and then there were three.
Three little raindrops without a thing to do,
One went SPLAT and then there were two.
Two little raindrops waiting on the sun ,
One hit the ground and then there was one.
One lonely raindrop was just about done,
He fell down and then there were none.

Oh, Mr. Sun

Oh, Mr. Sun

Sun

Mr. Golden Sun

Please shine down on me

Oh, Mr. Sun

Sun

Mr. Golden Sun

Hiding behind the tree

These little children are asking you

Please come out so we can play with you

Oh Mr. Sun

Sun Mr. Golden Sun

Please shine down on

Please shine down on

Please shine down on ME!


Monday:

Introduce theme:

  1. Read a book about spring weather.
  2. What kind of weather occurs in the spring? (sunny, rainy, stormy, cool, warm etc)
  3. What should we wear?


Rain Cloud Craft

Materials:  blue construction paper, tissue paper, cotton balls, yarn or ribbon, contact paper, cereal box

  1. cut a cloud shape out of our cereal box
  2. punch 3 holes in the bottom of the cloud
  3. cut and tie 3 ribbons to hang your raindrops
  4. glue and stick cotton balls covering the cloud
  5. cut out 3 raindrops from the blue paper, cut out the middle
  6. place each on a piece of contact paper, fill center with tissue paper, sandwich with another piece of contact paper
  7. tape or tie onto string, optional: add smile and googly eyes
  8. hang in window


Umbrella Raindrop Counting

Materials: print umbrella from the link below have your child color it, 10+ raindrops cut from blue construction paper, sticky magnets OR make out of felt for feltboard.

http://www.lessons4sundayschool.com/index.php?pr=Memory_Verse_Clip_Art

  1. Stick magnets on the backs of the raindrops and the umbrella and diplay on fridge
  2. Let your child make it rain on the umbrella and then count how many raindrops are falling, 1-10+…

Tuesday:

Windy Paint Kites

Materials:  straws, construction paper, paint

  1. Cut the paper into a kite shape
  2. Squirt some paint in the center of your child’s paper and allow them to blow through the straw to paint the paper. Continue with different colors until your child is done
  3. Allow to dry
  4. attach ribbon and two criss-cross straws


Rainstick Craft

Materials:  paper towel roll, tape, toothpicks, uncooked rice/beans/lentils, construction paper, markers/paint/crayons

  1. poke several toothpicks into the paper towel roll, cut ends that stick out and tape over
  2. have your child paint and decorate the construction paper, allow to dry
  3. tape one end of the roll closed
  4. add rice/beans/lentils
  5. tape the other end closed
  6. wrap the paper towel roll with the construction paper and tape


Wednesday:

It Looked Like Spilt Milk Painting

Materials: Book – It looked like spilt milk, blue paper, cloud paint (glue, shaving cream, white paint) paint brush

  1. Read the book, It Looked Like Spilt Milk, to you child and invite them to create their own cloud painting
  2. After they’re finished ask them what it looks like, remind them of the book and the animals and characters that the clouds resembled


Rain Dramatic Play/Puddle Jump

Materials:  Prop box filled with rainy day items: raincoat, rainboots, child’s umbrella, thunderstorm music.  Tape/contact paper large blue ‘puddles’ on the floor and have your child puddle jump from one to the next. (if the weather is nice you can do this outside with chalk)


Thursday:

Thunder Painting

Materials:  black construction paper, black and white paint, paintbrush, thunderstorm cd track

  1. Have your child paint while listening to the music.  Discuss how the music makes them feel etc


Water Sensory Bucket

Materials:  blue tinted water with scoops, boats, watering can (make it rain), etc


Friday:

Sibling project:


Garden Week 2 and Easter Activities

The Garden/Easter

March 18 – 22

Letter Kk:

  • Kk words:
  • Kk writing

Books:

    1. Plant A Kiss by Amy Krouse Rosenthal
    2. The Tiny Seed by Eric Carle
    3. And Then It’s Spring by Julie Fogliano
    4. Wake Up, Spring! By Lisa Campbell Ernst
    5. The Curious Garden by Peter Brown
    6. The Easter Egg by Jan Brett
    7. Hatch by Katie Cox
    8. Happy Easter, Mouse! By Laura Numeroff and Felicia Bond
    9. Where Are Baby’s Easter Eggs? By Karen Katz
    10. Corduroy’s Easter by Don Freeman and Lisa McCue

Songs/Feltboard:

Five Little Bunnies

http://lilcountrykindergarten.blogspot.com/2012/03/five-little-bunnies-subtraction-shared.html

Follow this link and print the song and finger puppets


Little Bunny Foo Foo

Little Bunny Foo Foo,
Hopping thru the forest,
Scooping up the field mice and boppin’ ’em on the head.
Down came the good fairy
And she said:
“Little Bunny Foo Foo, I don’t want to see you
Scooping up the field mice and boppin’ ’em on the head
I’ll give you three chances,
And if you don’t behave
I’ll turn you into a goon!”
The next day:

…two more chances…

…one more chance…

… if you do it one more time…

Little Bunny Foo Foo
Hopping thru the forest,
Scooping up the field mice and boppin’ ’em on the head
Down came the good fairy
And she said:
“Little Bunny Foo Foo
I don’t want to see you
Scooping up the field mice and boppin’ ’em on the head.
I gave you three chances
And you didn’t behave.
Now you’re a goon!
POOF!!”

The moral of the story is:
HARE TODAY, GOON TOMORROW


Monday:

Introduce theme:

  1. Read a book about gardens/gardening/plant life cycle.
  2. What does a flower start out as?  A SEED!  Show different flower/veggie/fruit seeds.  Let your child touch and hold them to experience their size and texture.  Explain to him that just like flowers are all different so are their seeds.
  3. Show your child pictures of a flower in different stages of growth.  Discuss the things flowers need to grow.  (water, soil, and sunshine)


Flower Garden Mural

Materials:  White butcher paper (cut at about 4 feet), paint, markers, crayons, colored pencils, etc., flower-shaped sponges,

  1. Trace your child on the paper.  Be creative and have them waving, running, etc.
  1. Work with your child to create a mural of them playing in a flower garden.  Stamp flowers using the sponges and paint.  Make bees and bugs using finger prints. Wait for it to dry.
  1. Use the colored pencils, markers, crayons, etc to complete the mural.
  2. Work on this throughout the week.  Hang in a spot where they can stand in their ‘mural body’.


Flower Count and Sort

Materials: cut flowers out of 3-4 colors of craft foam (or get the pre-cut flowers), coordinating paper or foam mats

  1. Ask your child to sort the flowers by color onto the mats
  2. Count the flowers on each mat
  3. Label the mat with the number (Write it or cut it out of craft foam and glue for a more tactical experience for your child.  They can re-count the flowers throughout the week and tract the number label with their fingers)


Tuesday:

Rainbow Flower Garden Sensory Bucket

Materials:  Green Rice, gardening tools, fake flowers in ROYGBP

Set up the sensory bucket with green rice (scent it with some vanilla, peppermint, or almond extract for a fun twist).  Read “Planting A Rainbow” with your child.  Present them with the materials and tell them that it’s their turn to plant a rainbow.


FamilyGarden Art Project

Materials:  Green construction paper, blue construction paper, paper doilies or round coffee filters, pictures of each member of your family, glue, scissors, circle punch, water color paints

  1. Ahead of time, cut the green construction paper into stems and leaves of flowers.
  2. Have your child paint the doilies with water color paints and let dry.
  3. Have your child glue the painted doilies, stems, and leaves onto the blue construction paper
  4. Punch out the faces of your family members and have your child glue them to the center of the doilies.


Wednesday:

Gardening Bath

http://www.bathactivitiesforkids.com/2013/01/gardening-bath.html


Bubble Paint Hydrangeas

Materials:  plastic cups or bowls, dish soap, food coloring, water, straws, green paper, white construction paper

  1. Combine dish soap (about 1 tablespoon), food coloring (one cup per color),and water(to the top of the cup), into plastic cups.
  2. Use the straw to blow bubbles out of cup so that they are almost overflowing. *do not suck in! Dish soap does not taste good.
  3. Press paper gently on the top of the cup, popping the bubbles. Wait 5 seconds for the bubbles to set on paper.  Gently lift the paper off the cup, and pop the remaining bubbles with your breath.
  4. Repeat steps 2 and 3 until you are satisfied with your artwork.
  5. Let the artwork dry flat for 30 minutes.
  6. Glue on leaves cut from green paper

Thursday:

Easter Egg Wet Chalk Art

Materials:  Sidewalk chalk, blue painter’s tape, cardstock

  1. Cut out egg shapes from cardstock
  2. Crisscross tape over the egg
  3. Wet the sidewalk chalk in a cup of water and color the egg completely
  4. Carefully peel the tape off the egg

Easter Bunny Bonnets

Materials: tissue paper, glue, paper plates

Cut out the middle of a paper plate except for about an inch or two. Cut up the middle of the circle to form the two ears. Fold them up and bend slightly so they stand straight. Give the children spring colored tissue to glue around the brim.


Friday:

Dying Easter Eggs

Materials: hard boiled eggs, packets of kool-aid, water, wire cooling rack,  paint brush or spoon, (stickers/rubberbands if desired)

1. Arrange eggs on wire cooling rack.  *paper towel lined jelly roll pan underneath to collect excess kool-aid*

2. Mix your kool-aid with approx. 2/3 c water for each packet.  Wrap your eggs with rubber bands or stick on stickers (remove after dying)

3. Have your child paint with a paintbrush and/or spoon the kool-aid over the eggs.

4. When finished dying – Rinse with water to set the dye, dry.


Extra/Alternative Activities:

Q-tip Painted Eggs

http://www.notimeforflashcards.com/2013/03/q-tip-painted-easter-eggs-fine-motor-art.html


For the Littles:

Footprint Easter Bunny

Welcome Spring! Garden Theme

DSC_0019

Letter Jj:

  • Jj words: jaguar, jellybeans, jacket, jack o lantern, juice
  • Jjwriting

Books:

    1. Yucky Worms by Vivian French
    2. My Garden by Kevin Henkes
    3. Oliver’s Vegetables by Vivian French
    4. Outside Your Window by Nicola Davies
    5. The Tiny Seed by Eric Carle
    6. Plant A Little Seed by Bonnie Christensen


Song/Feltboard:

The Gardener Plants the Seeds

(tune: The Farmer in the Dell)

The gardener plants the seeds.

The gardener plants the seeds

Hi ho the derry oh,

The gardener plants the seeds


Second Verse: The rain falls on the ground

Third Verse: The sun shines bright and warm

Fourth Verse: The seeds begin to grow

Fifth Verse:  Flowers grow everywhere


Feltboard:

5 Little Seeds
5 Little seeds in the deep, dark ground,
sleeping and waiting, not making a sound.
Along came an ant, across the garden floor,
He carried off one seed, and then there were four.

4 Little seeds in the deep, dark ground,

sleeping and waiting, not making a sound.
Down came a birdie, out of the tree,
He ate up one seed and then there were three.

3 Little seeds in the deep dark ground,
sleeping and waiting, not making a sound.
Out snuck a cat, as cats often do,
He dug up one seed, and then there were two.

2 Little seeds in the deep dark ground,
sleeping and waiting, not making a sound.
Along came a puppy, out having fun,
They ran through the planted seeds, and then there was one.

1 little seed in the deep dark ground,
sleeping and waiting, not making a sound.
Down came the rain, and warm was the sun,
They woke up the little seed, his sprouting had begun!


Monday:

Introduce theme:

  1. Read a book about gardens/gardening/plant life cycle.
  2. What does a flower start out as?  A SEED!  Show different flower/veggie/fruit seeds.  Let your child touch and hold them to experience their size and texture.  Explain to him that just like flowers are all different so are their seeds.
  3. Show your child pictures of a flower in different stages of growth.  Discuss the things flowers need to grow.  (water, soil, and sunshine)


Planting Seeds

Materials: small flower pot, potting soil, flower seeds (vegetable/herb seeds etc), child size gardening gloves, child trowel. Optional: Miracle Grow Mini Greenhouse

  1. Read The Tiny Seed by Eric Carle
  2. Discuss with your child what happened and the process of planting a seed and growing a flower.  Ask your child if they would like to plant a seed.
  3. Come up with a list of things that you need to use for planting your flower.  Gather those items together with your child.
  4. Together plant your seeds.  Discuss what happens next (what your seed needs to grow, watching it grow, put in the sun etc)
  5. Daily – sprits with misting water bottle to keep seeds and soil damp


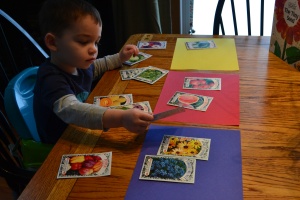
Flower-Vegetable-Fruit Sorting

Materials: various veggie, fruit and flower seed packets OR computer printed pictures, three large circle construction paper cut-outs

DSC_0019

  1. Ask your child to help you sort the seed packets.  Explain that some are vegetables, some are fruits and some are flowers and they’re all mixed up.
  2. Sort the seed packets onto the different construction paper circles


Tuesday:

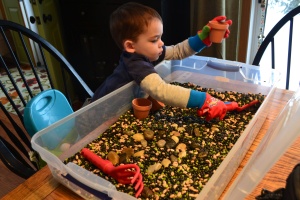
SpringGarden Sensory Bucket

DSC_0023DSC_0024

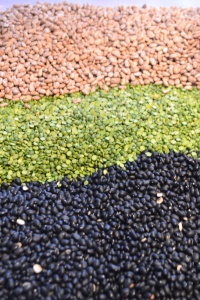
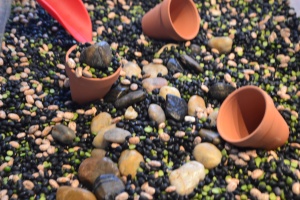
Materials:  dried black beans, green lentils, pinto beans, river rocks, small terra cotta flower pots, tongs, measuring cups, gardening gloves, trowels, rakes etc.

DSC_0027

Sunflower Fridge Magnet Art Project

Materials:  small paper plate, yellow paint, large craft stick, sunflower seeds, glue, paintbrush, magnet strips (make one sunflower or several and give as gifts for Easter)

  1. Ahead of time, cut the paper plate so it looks like a sunflower.
  2. Have your child paint the paper plate yellow and the craft stick green, allow to dry.
  3. Have your child glue sunflower seeds onto the center of the paper plate.
  4. Once the glue is dry, help your child to tape or glue the craft stick to the back of the flower, attach a magnet strip

Image below is to give a general idea of the finished product:

Wednesday:

Worms in the Dirt Afternoon Snack

Materials: chocolate pudding, oreos, gummy worms, mint

  1. Before nap make the chocolate pudding with your child, allow to set up during nap.
  2. After nap, crush the oreos in a plastic ziplock bag with your child using a rolling pin
  3. Put together your snack together. Add a sprig of mint


Carrots for the Rabbit Play-Doh

Materials:  orange play-doh, ‘carrots for the rabbit’ play-doh mat, page protector

  1. Print the ‘carrots for the rabbit’ play-doh mat: http://www.prekinders.com/2011/04/carrots-rabbit-play-dough-mats/  and put inside a page protector.
  2. Encourage your child to create carrot shapes and ‘plant them below the grass in the dirt.  You can also make flowers etc…


Thursday:

Parts of a plant

Materials:  Materials will vary – You can make this as a feltboard activity, table activity, or attach magnets for a fridge activity.


  1. Create four separate parts of a flower for you and your child to discuss and construct together again and again:
    • Flower (produces seeds to grow more flowers)
    • stem with leaf (leaf absorbs sunlight)
    • stem (transports water and nutrients to flower)
    • roots (absorb water from the soil)

Flower Bouquet

Materials: various colors of tissue paper, flesh colored construction paper, green construction paper, glue

  1. Have your child tear up some tissue paper
  2. With your child, trace their hand and part of their wrist/arm and cut out of flesh colored construction paper.
  3. With your child cut out strips of green construction paper for flower stems (a leaf or two if you want as well)
  4. Have your child glue the stems and hand on the paper so it looks like the hand is holding a bouquet.
  5. Have your child glue the tissue paper on the tops of the stems for the blooms.

Friday Fun-day!

Go on a special outing, have a special lunch, stay in jammies all day.  Offer several suggestions and let your child choose and run the show for the day!


Extra/Alternative Activities:

Flower Prints

Materials: paint, construction paper, paint, paint palette, scissors, paper towel/toilet paper tubes

  1. Cut the ends of the paper tubes and fold back to create a stamp.  Make them different sizes and shapes to create different looking flowers.  Add green stems, leaves and center
  2. With the contact paper sticky side up have your child stick on the tissue paper filling in the rainbow and clouds
  3. When they’re finished use another piece of contact paper sandwiching the tissue in-between
  4. Display on window


For the Littles:

Make a handprint bouquet